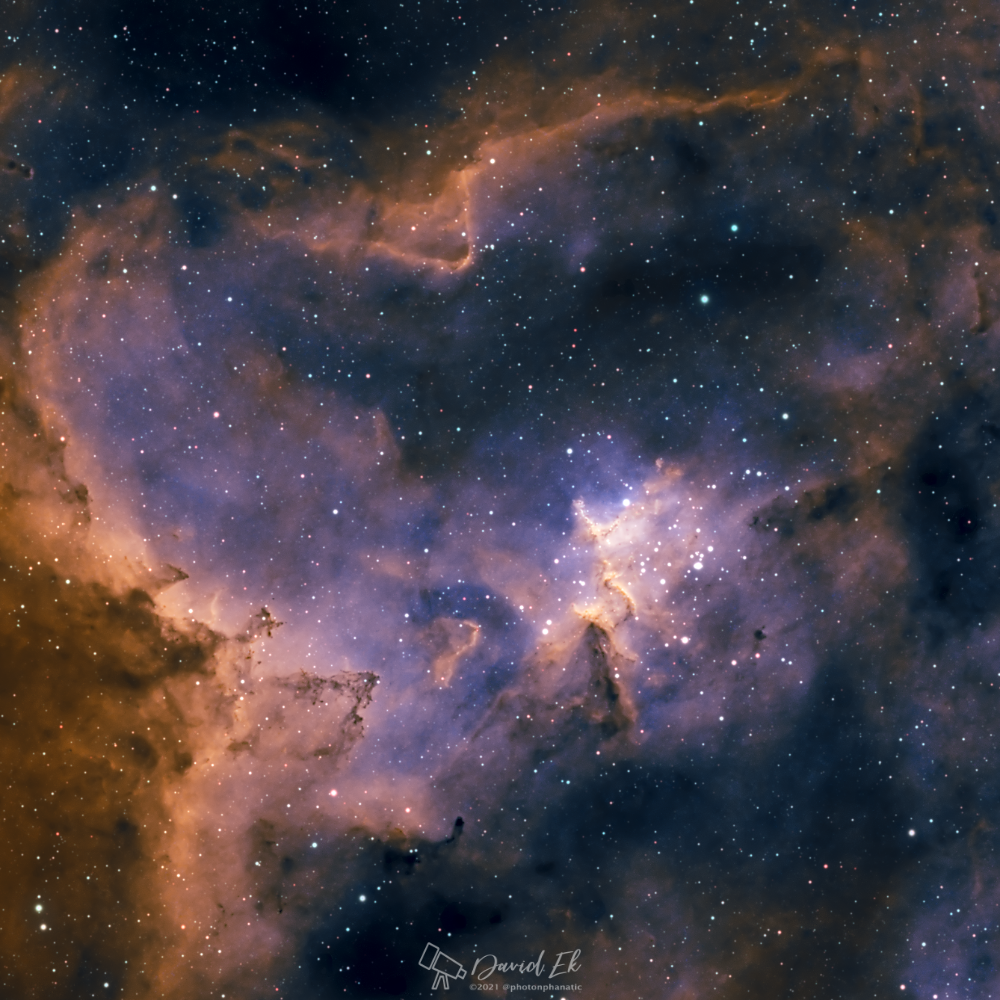
I tried imaging the Heart Nebula about a year ago, when I first started shooting astrophotographs. At that time, I was using an unmodified Canon DSLR (the 250D), and I was still pretty inexperienced in processing my astro data. Unsurprisingly, the result was not great, and I was gun shy about trying to shoot it again. But I gave it a shot again a few days ago, this time armed with a dedicated astro camera (the ASI533MC Pro color camera), an L-Extreme dual-narrow-band filter, and a lot more experience processing images (as well as PixInsight now being in my toolbox). I’m much more pleased with my result this time around.
This image was captured using the aforementioned camera and filter through my Sky-Watcher Esprit 100 apo refractor on an iOptron GEM45 mount. I took a total of 96 5-minute subs and threw away 22 of them because of various faults. So I ended up with about 6 hours of data on this target. I also shot bias, flat, and dark frames, but for whatever reason the dark frames were faulty and screwed up the calibration process, so I ended up not using them. Interestingly, some claim that the ASI533MC Pro doesn’t really need dark frames because of its extremely low dark current, and that dark frames can actually add noise to the images in this case. In this case it doesn’t seem like the end result suffered any.
I recently added StarXTerminator (from Russell Croman) to my arsenal of processing tools. StarXTerminator is an add-on for PixInsight (and also works with Photoshop and Affinity Photo) that removes stars from your images. In my opinion it does a better job than does StarNet++, leaving fewer artifacts as well as working faster. StarXTerminator can be applied to an image either before or after stretching, as well.
There are definite advantages to working with a starless image during processing. For one, it alleviates the need to mask the stars or otherwise protect them while modifying the image through stretching, altering the colors, etc. Once the starless version is finished, one can add the stars back to the image using the star mask that can be created along with the starless image. Additionally, the star mask can be manipulated by itself to fix colors, minimize stars, etc. Some folks even prefer to just output the starless version, which can sometimes be very striking on its own. For me, I prefer a few stars in the image, but that’s a matter of personal preference.
Normally what I’ve done is to run StarXTerminator after stretching to separate the stars. Then I would use Morphological Transformation (in PixInsight) to reduce the size of the stars and then combine them back with the final starless image to create something to my liking. Morphological Transformation can sometimes result in undesired artifacts, though. So for this image, I tried something new (to me, anyway). When I processed this image, I applied StarXTerminator prior to stretching, and made sure to have it create the star mask as well as the starless image. Then I stretched and processed the starless image as I usually would. Once that was complete, I gave the star mask a small stretch to make the stars as visible as I wanted, and then I combined them back with the starless image. Stretching the linear star mask gave me a better result than did using Morphological Transformation on an already-stretched star mask to reduce the stars. I doubt that I’m the first to try this, but I haven’t seen any mention of others doing this.
A final note: I processed this image with a false color palette to enhance the detail, and just because I like the look of it.