Back in March of 2021 I captured an image of the Seagull Nebula. The nebula is actually too large for me to capture in a single frame using my current equipment (A Sky-Watcher Esprit 100 f/5.5 refractor with a ZWO ASI533MC Pro camera) so I split the target into four separate frames and then used Microsoft’s Image Composite Editor (ICE) and Affinity Photo to combine the frames and create the final image. ICE is a really cool tool, capable of stitching together panoramas and mosaics almost effortlessly, and I’ve used it several times for different projects. I’ve also written previously about Affinity Photo and how it’s an excellent general-purpose image processing tool for a modest cost–an excellent alternative to the pricey Photoshop package. But I’m in the process of transitioning to PixInsight as my main tool for processing my astro images–it’s one of the most popular and powerful tools built specifically for astro image processing–and I wanted to learn how to create a mosaic using PixInsight. So I recycled my Seagull Nebula data from March to see what I could do.
This isn’t going to be a tutorial–there’s no sense in me rehashing what I learned from doing a little research on the web. But I *will* list my references so you can find them if needed. First, for comparison, here’s my original Seagull Nebula Mosaic:

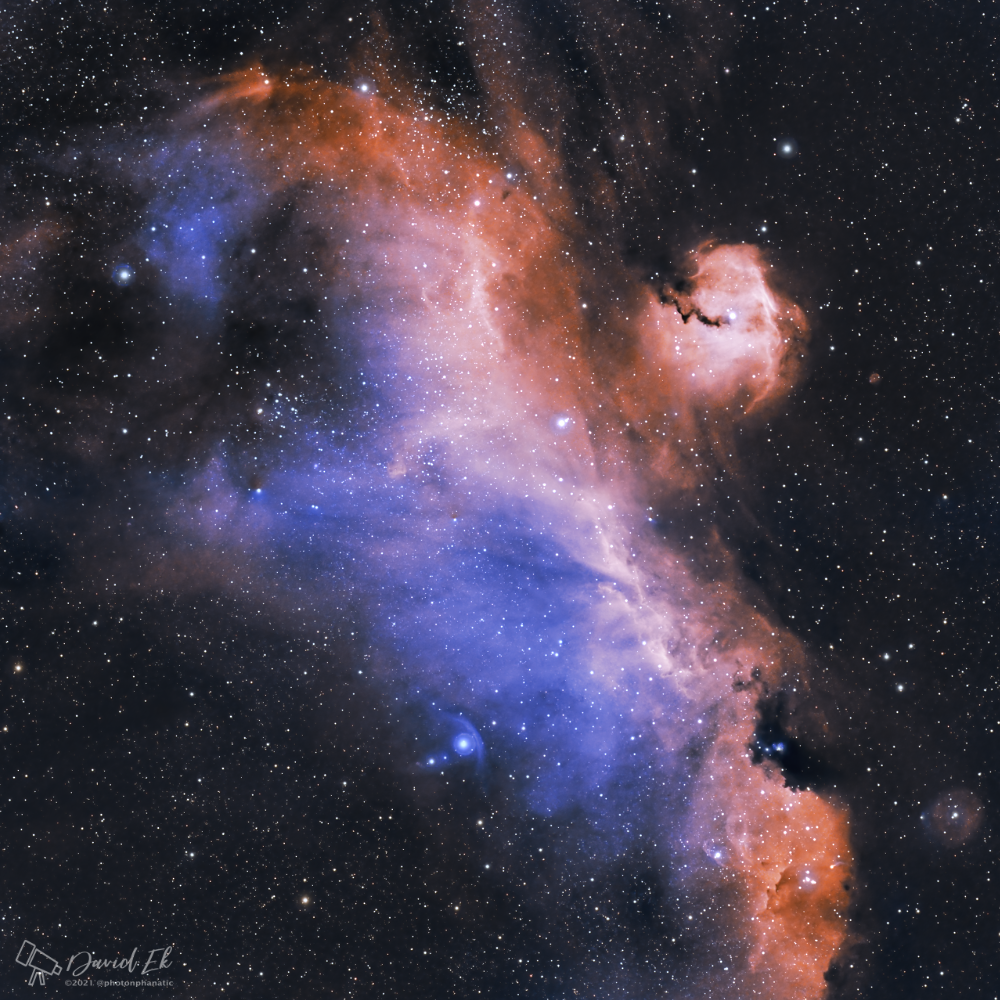
The original was captured as about 20 10-minute subs per panel, using an Optolong L-Extreme dual-band filter. The color palette in the original processing was not significantly altered and shows a heavy contribution of H-alpha. The version that I reprocessed using PixInsight (shown at the top of this post) was processed using a false/pseudo-Hubble color palette that reveals more of the O-III contribution.
I’ve been following a process I found in this YouTube video from lukomatico to process my narrow-band one-shot-color data with a simulated Hubble palette, and I find I’m much more pleased with the result than I have been with the predominantly-red images I’d been turning out previously. This time, in addition to the false-color palette, I followed this video tutorial from Amy Astro to create the mosaic using PixInsight. While tedious, the process for creating a mosaic using PixInsight is straightforward and yielded excellent results. In short, I created a mosaic using the top two panels of the 4, then another mosaic using the bottom two panels, and then created another mosaic combining the two smaller mosaics I just created. It would be even more tedious to do this with, say, a six-panel mosaic. I may actually attempt this a little later in the year when I can image the Andromeda Galaxy again. Good old M31 will require six panels to capture its entirety using my current equipment.
Even though PixInsight has become my primary tool for processing astro images, I still use Affinity Photo regularly to sharpen and denoise the image, tweak the colors, add my signature/logo, and resize and export into various image formats. I also use Denoise AI and Sharpen AI from Topaz Labs as needed.