
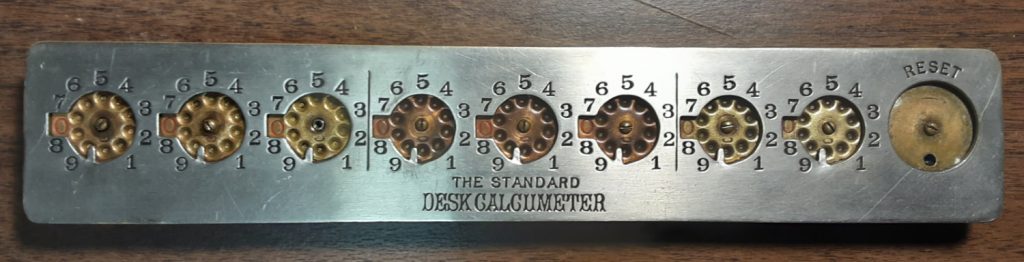
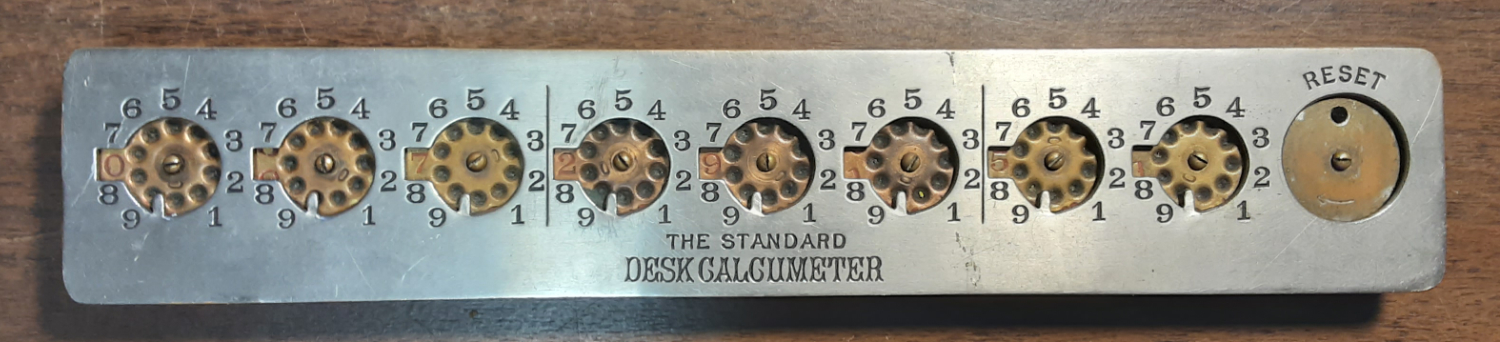
A few months ago in a little consignment shop in our locality, I stumbled across something I’d never seen before. Stamped as “The Standard Desk Calcumeter,” it appeared to be some sort of calculating device. Since I have an odd fascination for such things, and since the price tag on it was only $12, I snatched it up. A little research confirmed that it was a cleverly-designed mechanical adding machine, where the digits were entered using the tip of a stylus on the rotating disks visible through the front plate. The Reset wheel on the far right side provided a quick and easy way to reset all the wheels to zero.
When I first obtained it, this machine was a bit on the grubby side, and the reset wheel was very difficult to turn. It was apparent that it had not been used in many years (unsurprisingly). It would be a bit of a restoration project.
Background
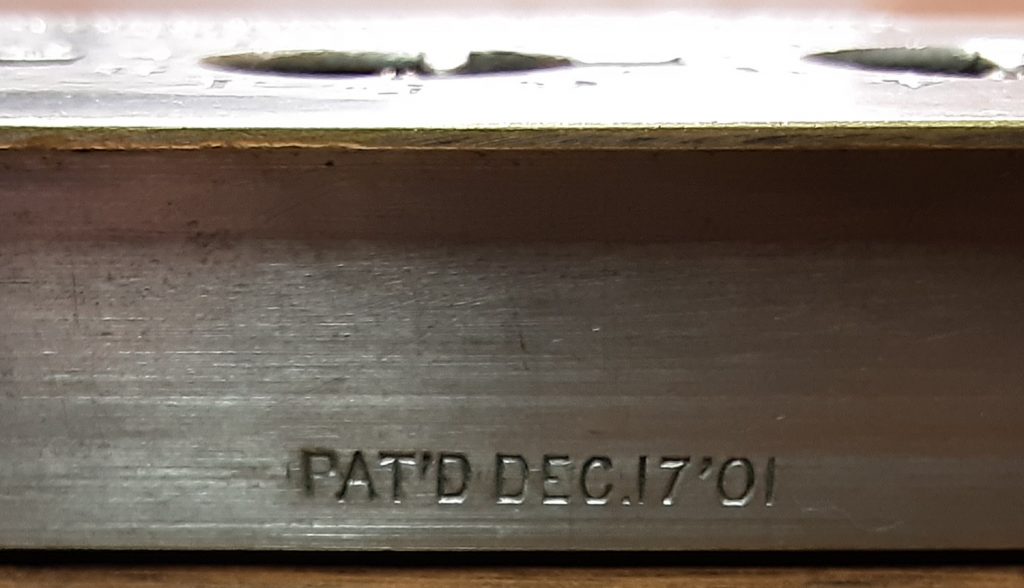
The original Calcumeter was patented in 1901, with another patent for the reset mechanism granted later, in 1908. Jaap’s Mechanical Calculator Page has some interesting history for this device and indicates that it was manufactured and sold by the H. N. Morse company from 1903 until about 1914, with claims of about 100,000 sold.

Here’s a Youtube video showing how to operate the Calcumeter.
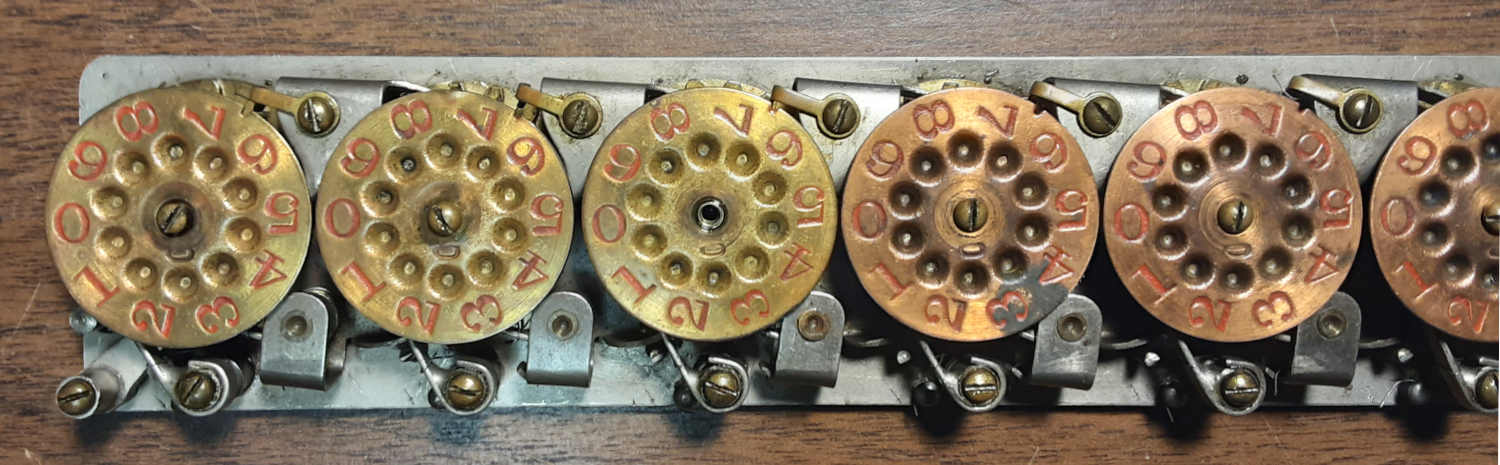
A number of different variants of the Calcumeter were produced, both with and without the reset wheel. The number of digits varied, for example. Different versions were also made for doing calculations using feet and inches, for example, and versions were also made for doing math with British currency. On these versions, some of the wheels would have a number of positions different than ten (12, say, for inches). I can’t help but wonder if something like this could have been made for doing hexadecimal math. The individual wheels were sometimes made from different materials (brass and copper), where the color of the metal was an indication of the group of digits (ones, thousands, millions, etc.).
Here is an instruction booklet for the Calcumeter.
Under the Hood
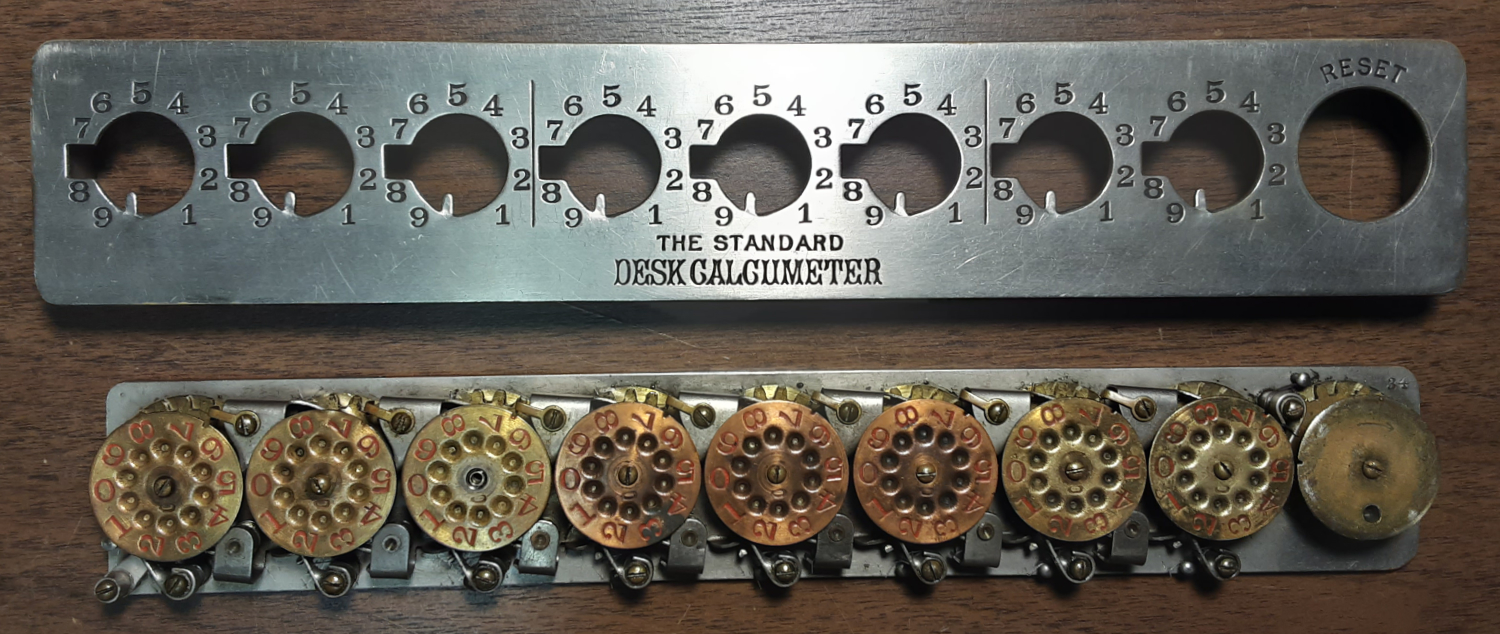
The mechanical design looks pretty daunting when you first open the case, but a close inspection revealed that it was actually a fairly simple device. Each digit was comprised of the wheel (the visible part) and a few levers and springs. Versions that included the reset wheel had a gear underneath the wheel with an additional lever and spring for resetting the digit to zero. The wheels themselves are allowed to move only in the clockwise direction and contain a cam underneath that implements the carrying function, incrementing the next digit whenever this wheel rotates back around to zero. In all, there are about 4 springs and associated moving parts per digit.

Restoration
As I mentioned previously, the Calcumeter came to me in good but grubby condition. All the digit wheels moved freely and did what they were supposed to do, but the reset wheel was gunked up and would barely budge. So the first job would be to give it a cleaning.

Because of the number of parts involved (especially all the springs), I wasn’t keen on doing a total disassembly in order to clean it thoroughly, so even in the “after” pictures (in the “Under the Hood” section above) you’ll still see a little bit of dirt and gunk. I wanted to get it back into operating order but didn’t want to take it apart any more than necessary to do so.
The first thing I did was to make up a tub of degreasing solution, using citrus-based bicycle degreaser, and let the mechanism soak in that for a few hours. Once I removed it from the tub, I used Q-tips to clean up the worst of the gunk. The degreaser worked okay, and freed up the reset mechanism so I could determine that resets were not working correctly–instead of resetting all the digits to zero, they’d end up with random values. Everything else seemed to work fine, but fixing the reset mechanism meant I’d have to dig deeper into the workings of the Calcumeter.
Fixing the Reset Function
I spent a fair amount of time examining and fiddling with the device so that I could better understand how it worked, and to determine what I would need to do in order to fix the reset function. This process eventually gave me enough confidence to begin removing the digit wheels to see what was underneath.
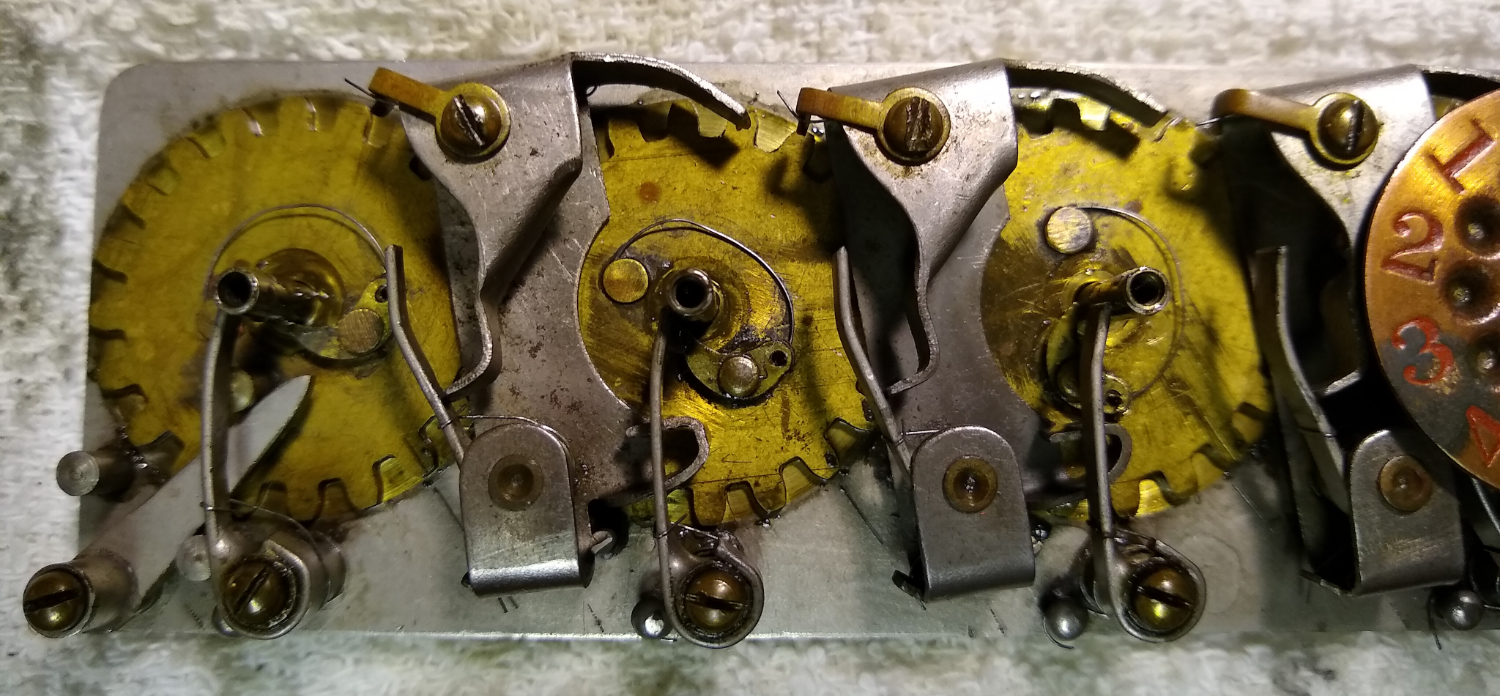
The reset wheel works by first being turned clockwise, and then counterclockwise back to its original position (there are stops on the gear for the most significant digit that limit the amount by which the gears can be turned). When turned clockwise, the gears under alternating digit wheels (starting with the most significant digit) turns clockwise, and the gears for the other digit wheels turn counterclockwise. When the reset wheel turns counterclockwise, the motion of the gears under the digit wheels is reversed.
Each gear has a spring-loaded “catch” that will engage a small cam on the digit wheel to cause it to turn along with the gear. The design is such that the “catch” will only engage the cam when the gear is turning clockwise. Thus, only every other digit will reset when turned clockwise, and the remaining digits reset when the reset wheel is turned counterclockwise. Brilliant!

Brilliant, except for the fact that it wasn’t resetting to zeroes. I concluded that the individual gears needed to be lifted and adjusted by a few teeth in order for them to read zero when a reset is performed. But two questions still needed answering: how to lift a gear and adjust its position by a few teeth without disturbing its neighbors, and how to know how much to turn the gear to fix the problem.
If you look at the picture above, there is a spring-loaded mechanism between each pair of gears that implements carrying from one digit to the next. Each is held in place by a screw. These are identified as the digit carry screws in the picture. By loosening (but not removing) the digit carry screws on either side of a gear, the carry mechanisms can be lifted enough to provide clearance for the gear underneath to be lifted and turned without affecting adjacent gears. Once turned and back in place, the digit carry screws can be tightened once again.
But how much to turn the gears? The approach I took was to split the reset function into two parts and do each part separately (be sure to watch the video above to see how the reset *should* work). The first part of the reset function has the reset wheel being turned clockwise to its stop. After that, the digits corresponding to the gears that turn clockwise with the reset wheel should all read as 9. If they do not, figure out how the gear must be turned in order to get its digit to read as 9. For example, if the wheel reads as 8 instead of 9, the gear needs to be turned by two teeth (since there are twenty teeth on each gear).
The second part of the reset function is to turn the reset wheel counterclockwise to return it to its original position. At the end of this part, all the digits should read as zero. Now you can adjust the remaining wheels based on how far off they are from zero. It’s a tedious process but fairly straightforward once you do it a couple times.
An unanswered question is “why was the reset function not working to begin with?”. It seems like the only way to foul it up would have been if someone had previously opened up the Calcumeter and messed around with the gears. Another possibility is if the digit wheels had been mixed around by mistake. It’s an easy assumption to make that each digit wheel is the same as every other one, but if that’s not the case, and the cams on the digit wheels are not all located identically, then swapping a pair of digit wheels could have messed up the reset function. I did not check out that theory, but I was very careful not to mix up the digit wheels.
Final Cleanup
The citrus degreaser had done some good, but there was still cleaning to be done, so I decided to use a product that I had on hand called BreakFree CLP. This product is actually intended for cleaning firearms and does a good job of cleaning gunk as well as lubricating. It sounded like exactly what I needed. I didn’t take any pictures of this step, but suffice it to say that by the time I was done I had a pile of dirty Q-tips from cleaning all the gunk.
After the final gunk-cleaning I gave it a good rinse under the faucet, dried it off (more Q-tips), and then used a little more BreakFree CLP to lubricate the reset gears. Could the Calcumeter have used more cleaning? Definitely. But I had gotten it to the point where it was no longer filthy and it worked smoothly. Additional cleaning would have required more disassembly, and with it the risk of losing parts, fighting springs, and other unforeseen problems. I was happy to get it to the point where it worked and was no longer grubby.
A Final Note for Sharp-Eyed Readers
Someone with an eye for detail might have noticed a screw missing from one of the digit wheels in some of the pictures above. Indeed, I didn’t notice it was missing until I looked at the photographs I took for this post. I found the missing screw and reinstalled it in the digit wheel, but the unit is still missing another screw (it was missing when I purchased it). This screw holds on one of the legs attached to the back of the device that allows it to be used in a tilted position. I have looked high and low for a suitable replacement but as of yet have found none. The machine screw is brass, with a round slotted head. The threads seem to be closest to the metric M2-0.4 size (2mm in diameter with a 0.4mm thread spacing), about 4mm in length. If you know where to find such a screw, please leave me a comment below. It turns out that the screws are #2-56 x 1/8″. I was able to find replacements at Albanycountyfasteners.com.