
ASCOM is a standard developed for interfacing computers and telescopes. From the ASCOM web site:
The ASCOM Initiative is a loosely-knit group of developers and astronomical instrument makers that work together to bring vendor-independent and language-independent plug-and play compatibility between astronomy software and astronomical instruments on Windows computers. ASCOM stands for the Astronomy Common Object Model.
Developers of astronomical software can use the ASCOM standard to allow their software to talk to any kind of telescope that includes an ASCOM-compliant driver, eliminating the need to develop a separate interface for each popular type of telescope out there. The remainder of this page describes the ASCOM driver I wrote for my digital setting circles project.
Introduction
This ASCOM driver allows the use of a variety of commercial and homebrew passive encoder-based digital setting circles systems with any Windows software that supports the ASCOM standard. This driver works with either alt-az mounts (like a dobsonian) or equatorial mounts. Equatorial mounts do not need to be accurately polar-aligned (although an accurate polar alignment will likely lead to a more satisfying observing experience).
This driver will not work with equatorial platforms.
The driver requires that ASCOM Platform 6 (or newer) is installed on your computer. It also requires Microsoft .Net 3.5 or higher.
Download the ASCOM driver for Digital Setting Circles
Supported Hardware
(Not all of these systems have been tested, but all should work with this driver.)
- Celestron Advanced AstroMaster
- Dave Ek’s Digital Setting Circles
- David Chandler Co. Deep Space Navigator
- Discovery Digital Setting Circles
- JMI NGC-MAX
- Lumicon Sky Vector
- Mountain Instruments Star Pilot
- Nova Astro Micro-Guider III
- Nova Astro Micro-Guider 5
- Orion Sky Wizard 2 and 3
- Orion Intelliscope
- Ouranos
- Software Bisque BBox
- Tele Vue Sky Tour
Installation
To install, just download the file using the link above, and then double-click it to run the installer. Windows Defender may pop up a screen like this, saying that it has “prevented an unrecognized app from starting.”
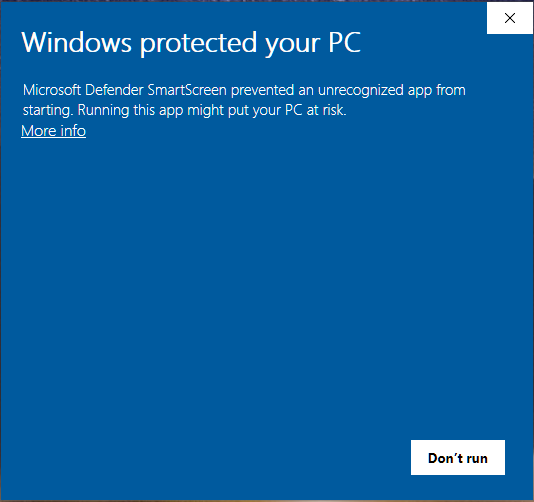
If you see that message, click on the “More info” link. That will expand the message and provide you with a button that says “Run anyway.” Click the “Run anyway” button to launch the installer.
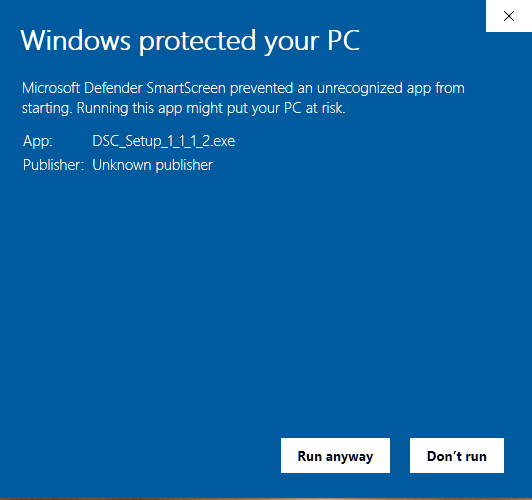
(Windows Defender pops this message up if the application being run hasn’t been code signed. In order for me to code sign this executable, I have to purchase a code signing certificate, which can cost upwards of a couple hundred bucks per year. Since I don’t make any money off this software or project, you’re stuck with seeing the message. Sorry.)
Setup and Configuration
Here’s a video showing how to set up the Digital Setting Circles ASCOM driver in Stellarium. If you’re not using Stellarium, use the detailed instructions below the video.
Detailed instructions:
1) If you have not already done so, run the installer for this driver to install it on your computer.
2) Consult the documentation for your preferred astronomy software package (e.g. Stellarium, TheSky, Cartes du Ciel, Hallo Northern Sky) for instructions on accessing the ASCOM Chooser dialog box. The ASCOM chooser looks like this:
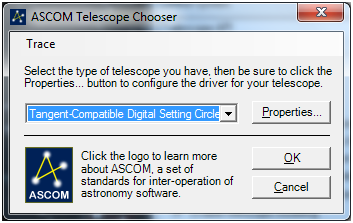
3) Select “Tangent-Compatible Digital Setting Circles” from the drop-down list, and then click the Properties button. The Setup dialog box will appear:
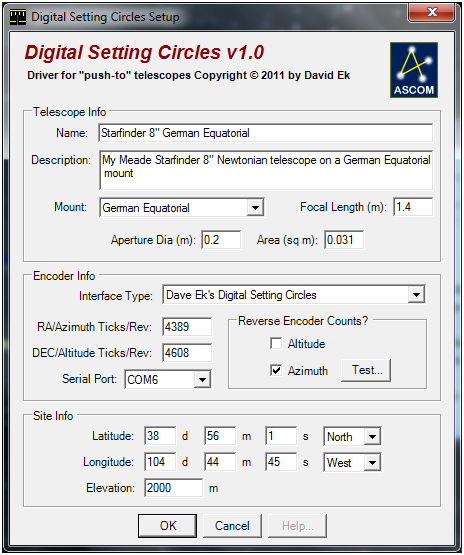
4) In the Settings dialog box, enter the following information:
Telescope Info:
Name: a name for your telescope (optional)
Description: a description of your telescope (optional)
Mount: the type of telescope mount you’re using (alt-az, German equatorial, or other equatorial) (optional)
Focal length: the focal length in meters (optional)
Aperture Dia: the diameter of your telescope’s aperture in meters (optional)
Aperture Area: the unobstructed area of your telescope’s aperture in square meters (optional)
Encoder Info:
Interface type: the type of encoder interface between your computer and your telescope (required)
RA/Azimuth Ticks/Rev: the number of encoder tics (in quadrature mode) traversed as your telescope makes one complete turn on its RA/azimuth axis (required)
DEC/Altitude Ticks/Rev: the number of encoder tics (in quadrature mode) traversed as your telescope makes one complete turn on its DEC/altitude axis (required)
Serial Port: the serial port to which your encoder interface is connected (required). The Serial Port field can be edited if necessary. Some bluetooth drivers don’t write their port names into the registry correctly, which can result in the names appearing incorrectly in the list of ports. If this happens to you, manually edit the name so that it is correct.
Reverse Encoder Counts?:
Altitude: checking this box causes this software driver to reverse the rotational sense of the encoder counts returned for the DEC/altitude encoder. This box should normally be left unchecked. Check this box only if you cannot obtain an accurate alignment any other way.
Azimuth: checking this box causes this software driver to reverse the rotational sense of the encoder counts returned for the RA/azimuth encoder.
Test button: clicking the Test button will guide you through a test of your encoder system to determine whether the Azimuth checkbox needs to be checked. The test is not foolproof, so if you cannot obtain an accurate alignment using the recommended settings, you’ll need to experiment to find the correct settings.
Site Info:
Latitude: the latitude of your observing location, as degrees, minutes, and seconds. Optional, but required for accurate calculation of azimuth, altitude, and sidereal time.
Longitude: the longitude of your observing location, as degrees, minutes, and seconds. Optional, but required for accurate calculation of azimuth, altitude, and sidereal time.
Elevation: observing site elevation above sea level, in meters.
Click the OK button when all settings have been entered. The settings will be saved for subsequent sessions.
Alignment and Use
Connecting to your telescope will result in the driver guiding you through the alignment process:
1) First, you’ll be asked to move your telescope so that its declination (for an equatorial telescope) or altitude (for an alt-az telescope) is approximately zero:
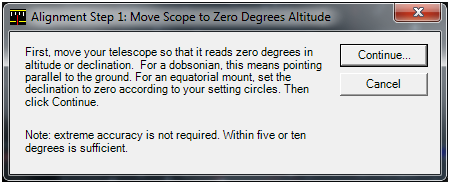
Note that extreme accuracy is not required. After pointing the telescope as instructed, click the Continue button.
2) Next, you’ll be asked to move your telescope so that its declination (for an equatorial telescope) or altitude (for an alt-az telescope) is approximately ninety degrees:
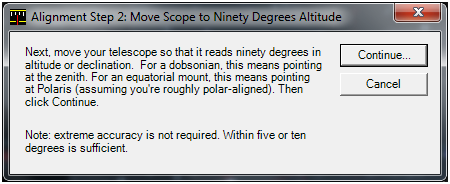
Again, extreme accuracy is not required. After pointing the telescope as instructed, click the Continue button.
3) Next you’ll choose two stars to use for the alignment process. First, you’ll be presented with the following window:
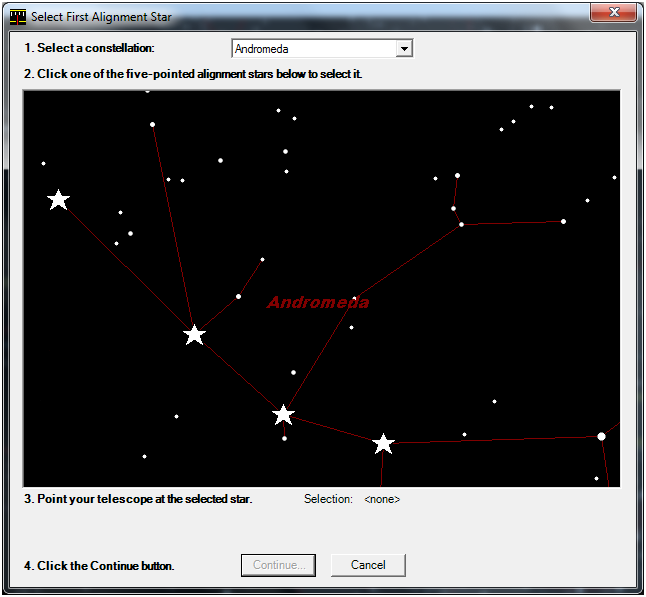
First, select a constellation from the drop-down list. Then click on one of the five-pointed alignment stars to select that star for alignment. Next, point your telescope at that star, centering it in the field of view. Then click the Continue button.
4) Repeat the process in the last step to select your second alignment star:
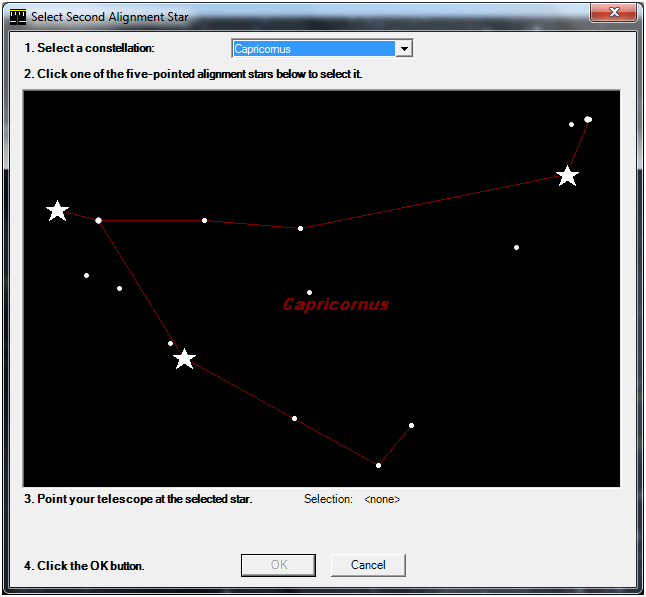
After you’ve selected your second alignment star and pointed your telescope at it, click the OK button to complete the alignment. At this point, your telescope should be aligned to the night sky, and your astronomy software should reflect the coordinates at which your telescope is pointing as you traverse the sky.
Slewing
Although slewing a telescope usually implies that a motor is moving the telescope, this driver implements slewing functionality by simply providing visual feedback as you manually push your telescope tube toward the desired target. Typically, you would initiate a slew in your astronomy software by selecting an item in the display and then choosing the Slew command. After you do so, you’ll see the following window appear:
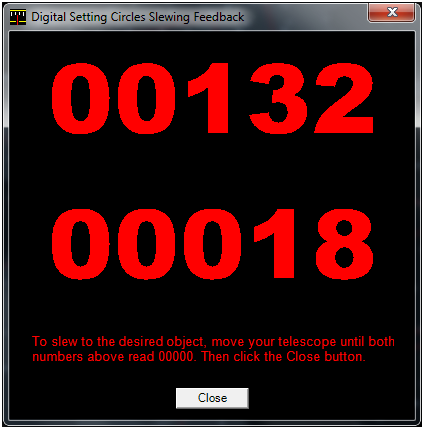
The numbers in the window will change as your move your telescope around in the sky. To slew to your intended target, push the telescope around until the numbers each go to zero. Then click the Close button. You should now be pointed at your desired target.
Sync
Sync’ing your telescope is the act of telling the driver that your telescope is actually pointed at a certain object. Typically, you’d do so in your astronomy software by selecting an item in the display and then choosing the Sync command. After you do so, you may observe that the telescope position indicator in the display shifts slightly.
The Sync command is useful for making minor corrections to the driver’s alignment data. No telescope alignment will be perfect across the entire sky, and you can use the Sync command to reduce the errors in parts of the sky where the initial alignment is not so good.
Troubleshooting
If the driver indicates that the telescope interface is not present, make sure that the correct serial port was specified, and that the interface is powered up and ready to go.
If the alignment is poor, first double-check the encoder resolutions that were entered. Also, for most hardware, make sure that the hardware was initialized with the correct resolutions. After that, you may need to vary the settings of the Reverse Encoder Counts checkboxes, experimenting with different combinations until you achieve a good alignment. If all else fails, leave a comment below describing your question or problem.
Hi Dave,
I am experimenting with a home-made push-to (and later go-to) mount for a Dobsonian scope, and came across your webpage. Although I think I have enough knowledge to at least get something going, your webpage is very interesting reading.
The alignment process you have described – is that part of the driver? Does the driver automatically fire up this process when it detects connection of a telescope?
Why is there an initial step to point the scope horizontally and then vertically? I though a 2 star alignment did just that: alignment with a first star and then align with a 2nd star and you’re done? What is the purpose of the horizontal+vertical sequence?
You mention that ‘practically all telescopes use an ASCOM driver’. I have seen some telescopes that communicate using a protocol such as LX200 – is this an alternative to using an ASCOM driver? (I have actually used the LX200 protocol to talk between a mounted laser pointer and Stellarium on a PC and this worked well.)
Have you released any source code for your driver? (Or do you know of any related source code?)
I like the idea of the program being able to show the layout of each constellation!
Regards
Hi Colin,
The alignment process resides in the driver and begins when the driver is commanded to connect to the telescope. The initial vertical and horizontal alignment steps are just approximate and help the driver get a sense of the telescope’s coordinate system. Those two steps do not need to be performed with any precision. When I wrote the alignment code 20 years ago I could not come up with a way to eliminate those steps, but perhaps it’s possible.
It’s true that there are many native telescope communication protocols as well, but manufacturers write ASCOM drivers to make it easier for software packages to communicate with their equipment. That way developers don’t have to try to support a bunch of different protocols.
I don’t generally release my source code.
Dave
I have an Astro Devices encoder kit installed on my G-11, and am using this with a Nexus II for communication. The encoders are 311,296 tick/rev mag-encoders; but your ASCOM driver seems to top out at 65000. BTW, no other ASCOM driver seems to support more than 65K ticks/rev either.
Is there any way that you might consider increasing the maximum number of ticks/rev so that I might use it with my encoders?
Thanks for any help you can provide.
Hi James, sorry but I’m not doing any mods to the pic code these days. I wrote it 20 years ago and it’s written in machine language, and such a seemingly simple change would actually require extensive code changes.
Dave
Good morning Dave,
A quick question about DSCs. I recently obtained a Discovery DSC and a Meade Magellan 1. The Discovery works great and I made an interface cable to communicate with software using your ASCOM driver. However, I didn’t see an option for the Meade Magellan 1 in the setup list of drivers. I gather from digging around the web that the Meade Magellan 1 is a Tangent unit. I was hoping that you might be able to shed some light on getting the Magellan 1 to talk to Cartes du Ciel. Thanks, and kind regards.
Howard,
I don’t have any information on the Magellan 1. I’ve seen claims that it’s a Tangent interface, so you could try some of the other options in the ASCOM driver to see if they work.
Dave
Dave- I have not been able to get my Meade Classic with Astromaster to “Talk” to my planetarium software, I have included the basic info of my system and wonder if you might be able to shed some light on where to look to fix this-
ASOM Platform 6.6=6.6.0.3444,
Driver- Dave Eks Digital Setting Circles
set up as ASCOM.EncoderDsc.
Telescope- Chooser- Tangent-compatable
Digital setting Circles on COMM3
From the ASCOM diagnostics screen:
Create Creating device
Connected Connecting to device
Error System.Runtime.InteropServices.COMException (0x80040FFE): Error during matrix inversion process: normalizing using a zero value!
at System.Dynamic.ComRuntimeHelpers.CheckThrowException(Int32 hresult, ExcepInfo& excepInfo, UInt32 argErr, String message)
at CallSite.Target(Closure , CallSite , ComObject , Boolean )
at System.Dynamic.UpdateDelegates.UpdateAndExecute2[T0,T1,TRet](CallSite site, T0 arg0, T1 arg1)
at System.Dynamic.UpdateDelegates.UpdateAndExecute2[T0,T1,TRet](CallSite site, T0 arg0, T1 arg1)
at ASCOM.DriverConnect.ConnectForm.btnConnect_Click(Object sender, EventArgs e) in C:\ASCOM Build\Export\ASCOM.DriverConnect\ConnectForm.cs:line 268
Dispose Disposing of device
ReleaseComObject Releasing COM instance
ReleaseComObject Completed release. Count: 0
GC Collect Starting garbage collection
GC Collect Completed garbage collection
Hi Dave,
Just wanted to give you a datum point or two.
I successfully connected Stellarium 0.22.1 for Windows with ASCOM 6 and your driver 1.1.1.2 to an Orion XT10 Intelliscope.
All worked well.
Thank you!
Blake
Thanks for letting me know!
Hi Dave,
Impressively clear presentation, nice work.
Recently snagged a home built 16″ Newtonian with a good equatorial mount at a thrift shop. My current project is to add a clock drive using an Arduino and stepper motor.
Longer term I’d like put the mirror into a more portable Dobsonian configuration with go to and tracking capabilities.
Does your software work with stepper motors? New at this, but seems like the Arduino could be programmed to output a pulse with each motor step. Should be equivalent to an encoder pulse?????
Thanks much.
Hi Dale,
You could probably program the Arduino to mimic the encoder outputs, but I think a better idea would be to integrate actual encoders into your setup. Then you’d have a closed feedback loop and it would likely work better and be more accurate. If you choose to mimic encoder outputs, make sure you understand the encoder outputs and how they change when the direction of rotation is changed. The encoders don’t output pulses so much as state changes.
Dave
Hi Dave. Our club has a 12.5″ refractor on a clock driven equatorial mount and have been testing out the circuit board. We can align, push the scope to an object, see the reticle move to it, and sync in Stellarium. The scope tracks, as verified by the camera mounted on it, but we see the reticle move off the target as Stellarium simulates the earth rotating. We expected the reticle to stay on the object via the encoders. We tried Cartes du Ciel and see the same issue. Any thoughts on why this happens? We may not be able to try again for a couple of nights, but thought we’d run this past you before our next try.
Thanks
Hi Tony, without being able to see the mount, I can only speculate. Is it possible that the encoders aren’t being turned when only the clock drive is running? It sounds like things work fine when you slew the scope, but then it appears to the board that the encoders aren’t turning and therefore the mount isn’t being driven. Then Stellarium or CdC sees that the scope’s not moving and the reticle drifts off the target over time.
Dave
Dave, We went out last night and found something we might have overlooked before. After aligning and slewing to a new star, we saw the scope is not pointed at the desired star. It was low and a tad to the side. We checked the encoder tick counts and we have then correct. That’s making us feel that possibly something physical is wrong and we will need to look into this further. Unfortunately, the guy who helped build this is out of town for two weeks. We will pass the info on to him and continue to troubleshoot. Will update when we find something.
Dave, I’m feeling a little foolish for bothering you with this. We went to the observatory last night, had test sheets to document every move, and were ready for a long night. Before we started one of the guys kept asking if we are positive the encoders are wired correctly. To humor him we opened the box your controller circuit is in, and sure enough we had them crossed. How we missed this initially using your test is beyond me. After reconnecting them, everything is working great with both Stellarium and CdC.
I apologize for bothering you with something like this, and appreciated your quick response. We are very impressed with how this works and the minimal investment of the clubs funds it cost. We had just installed new cameras and monitors on this scope and are now able to have a tool to train any members on it’s use to enhance our public outreach program.
Thanks again!
Tony, no worries–glad you got it sorted out. There’s always at least one forehead-slapping moment in each project, myself included.
Dave
Hi Dave,
thanks for you efforts on this.
I a trying to connect to my Dobsonian DCS (push to), which I built using Vladmirs program:
His software works fine when using skyatlas, but I also want to operate using my laptop and Stellarium.
Your driver does not connect. I am using the Intelliscope protocol, so basically, all interaction that should occur, is the driver sending the “Q” and the telescope responding with the stepper positions, right?
I do see this happening once, when I hit the “Test” button, and that’s it. (sniffing on the serial console).
Are you able to push me to a solution?
Many thanks,
Cheers,
Sven